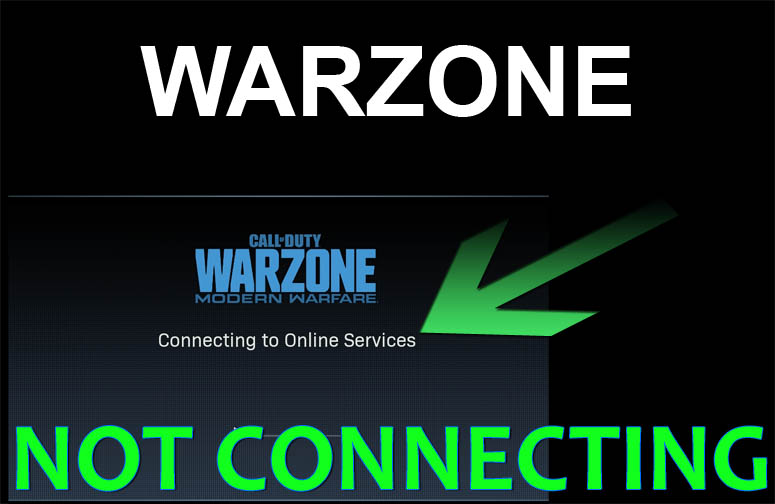
You open up the Battle.net gaming client and try to jump into a match of Call Of Duty Warzone. You navigate to the Call Of Duty Modern Warfare gaming title in your library and click the play button, where you move onto the “Connecting To Online Services” splash screen, at which point the game fails to load. In this instance, we attempted several gaming restarts and then stayed waiting on this screen on the final attempt for approximately 3 minutes. The game never successfully connected to the online services.
Entering PowerShell
What we’re going to do is press the Windows key on the lower left of our keyboard. That’s going to pull up the Windows start menu and give us access to the Windows task bar. We’re going to take the mouse cursor, hover over the Windows start menu icon, and right-click with the mouse. That’s going to give us a context menu.
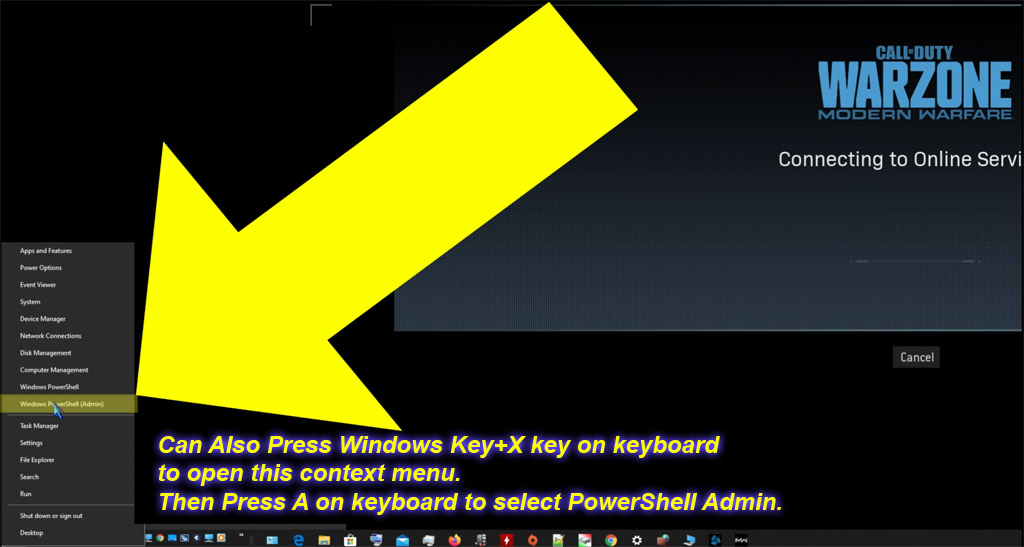
We’re going to scan up that context menu and look for: “Windows Powershell”. Depending on your system, that option may be called “Command Prompt,” depending on how your Windows installation is installed and whether it is configured to use Powershell or Command Prompt. But, there should be the option to select one or the other. In this case, we’re going to select Windows PowerShell.
For a faster hotkey route, you can also press the Windows Key ⊞ + X key on the keyboard to pull up the settings menu. Then, press the “A” key to select “PowerShell Admin.”
Once we select to open Windows PowerShell, we may receive a user account control notification from Windows asking if we would like to allow Powershell to run and make changes to the system. We’re going to click “yes.” Once we click “yes,” we’ll see the PowerShell window appear. We can see the Call Of Duty Warzone game still attempting to connect to the Online Services in the background…
Step 1: Release IP Configuration
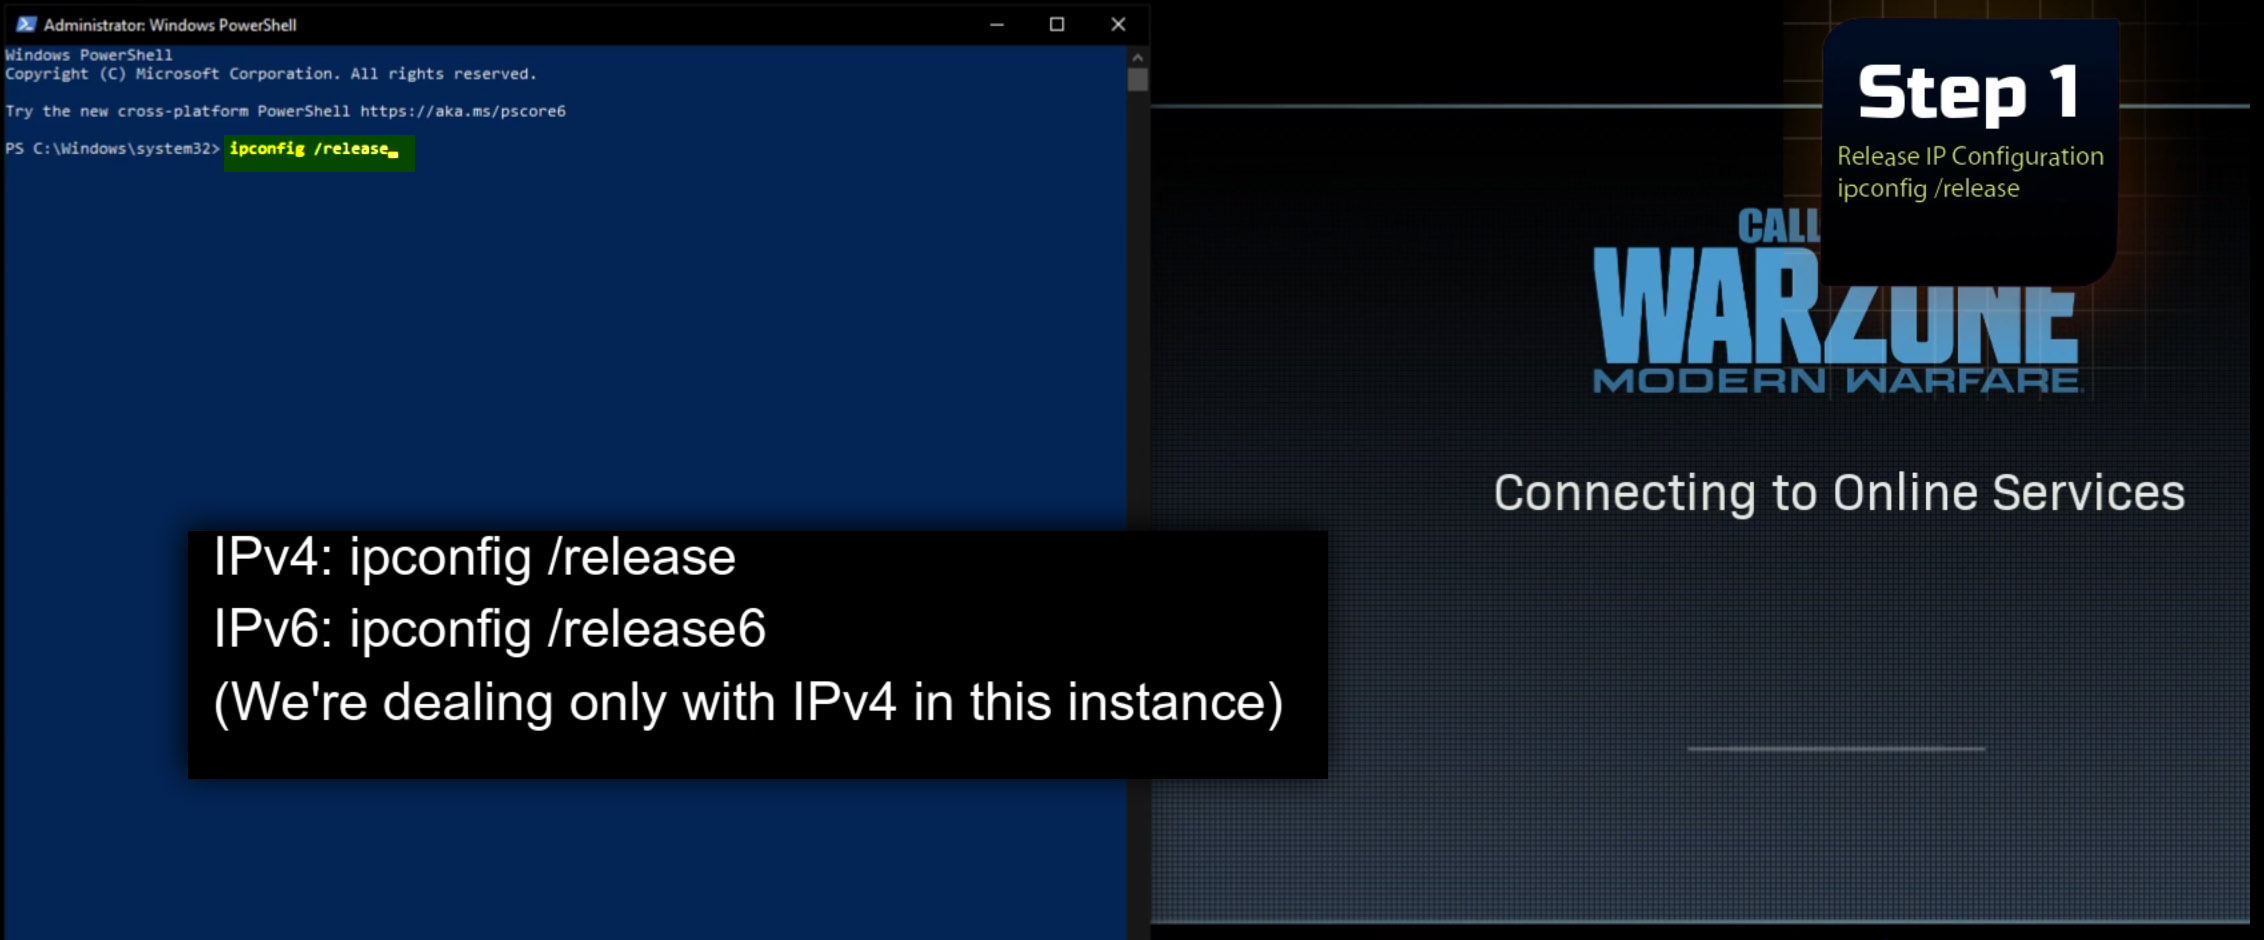
Now that we have PowerShell open, we’re going to attempt to release the IP configuration from the active adapters installed in the system.
1st we’re going to type: ipconfig /release
Then, we’re going to press the “ENTER” key on the keyboard.
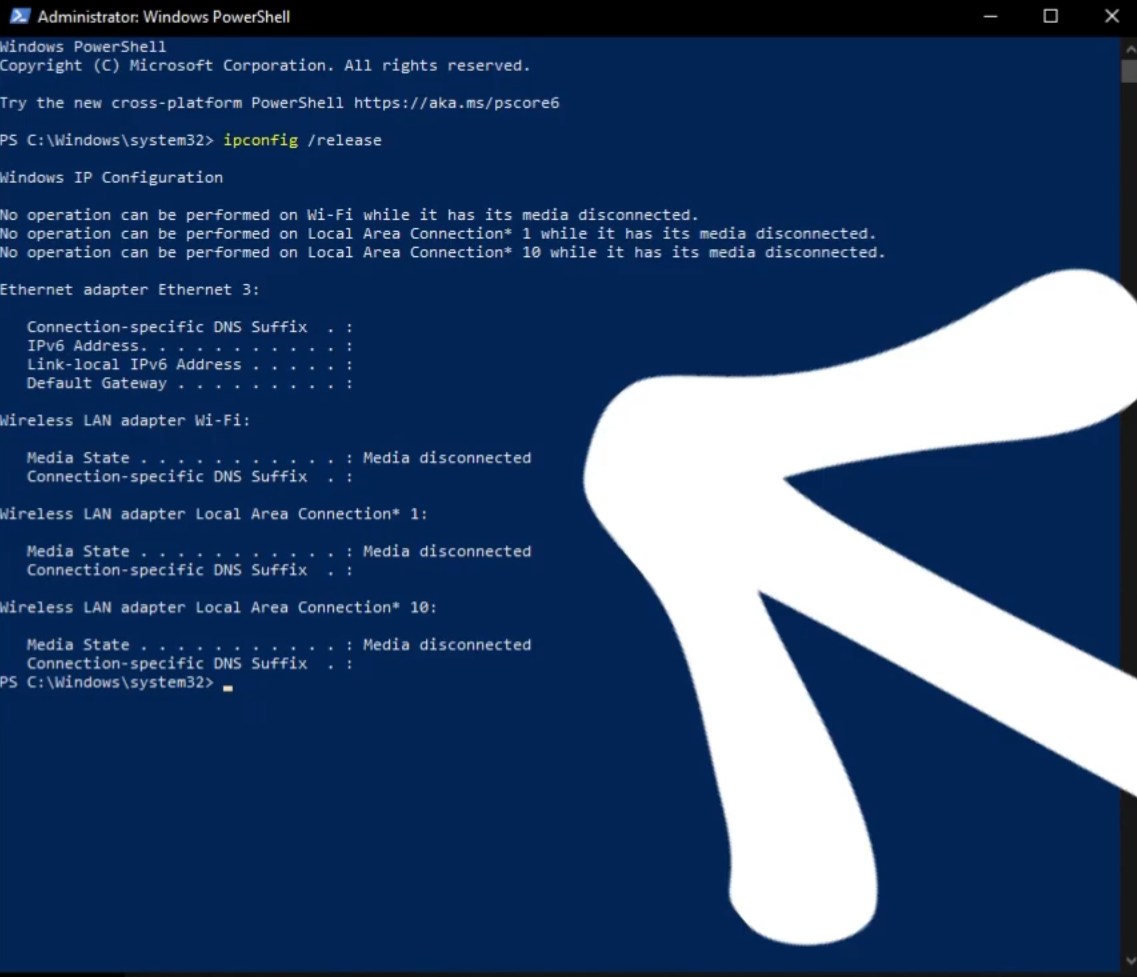
And we can see, immediately, the Call Of Duty Warzone loading screen has finally moved past “connecting to online services.” PowerShell has printed out the current configuration for the active adapters installed in the system. Since we just released the IP configuration, much of that information should be empty.
Step 2: Flush DNS Cache
While we are in the PowerShell or Command Prompt Window, we’re going to also flush the DNS Cache, just in case the cache has become corrupted as well.
2ND we’re going to type: ipconfig /flushdns
Then press “ENTER” key on the keyboard.
Step 3: Renew IP Configuration For Active Adapters
3rd we’re going to type: ipconfig /renew
Then, press “ENTER” on the keyboard. We’re going to wait for PowerShell or Command Prompt to printout the current configuration for the active adapters installed in the system. Once it does that, it should repopulate the IP addresses, the DNS suffix, the subnet mask and the default gateway information.

Now that we have gone through those three steps, we’re going to close the PowerShell/Command Prompt window.
After Closing PowerShell
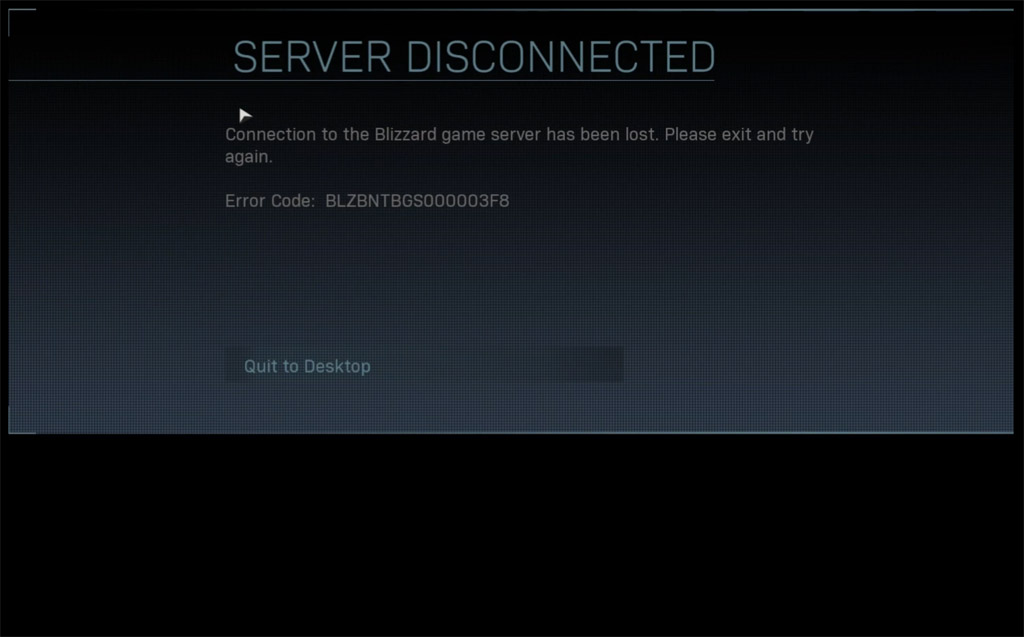
Here, we’ve received an error on the game loading screen that says, “server has been disconnected. Connection to the Blizzard game server has been lost. Please exit and try again. Error code…” Then it gives an error code and a button that we can click to quit to the desktop.
That’s to be expected, because we did release the IP address, flushed the DNS cache, and then renewed the IP configuration. So, everything that was connected to the internet from this system should have been interrupted.
We’re going to click “quit to desktop.” Once all of the Windows background processes related to the game have terminated, we will receive access to the play button in the Battle.net gaming client. We’ll try to click “play” again from the Call Of Duty Warzone gaming title in our library… We should see the progress loading screen complete, and then move onto the splash screen before loading the “Connecting to Online Services” screen. And it should now get us past that screen to check for an update and fetch the online profile before successfully loading the Warzone menu.
We’ll attempt to jump into a match just to ensure the game is working properly. And the map appears to load correctly.
But the first thing we notice is the game seems blurry and the colors washed out. What probably has happened is the game has reset our graphics settings/preferences. So we’re going to enter the settings menu by pressing the “esc” key on our keyboard. Then we’ll click the options button and then the “Graphics” tab from within the options menu.
And we see that it changed our “Display Mode” from “Fullscreen” to “Fullscreen Borderless.” So, we’re going to switch that back to “Fullscreen” exclusive. And it also changed our “Render Resolution” to 50; we’re going to change that back to 100%, and that should match the resolution of our monitor, which in this case is 3440×1440. So we put that back to 100%, and that should make the in-game graphics a lot clearer.
If you’d like to speed up some of the asset loading of the map, you can scroll down the graphics settings and enable caching of some of the map resources. In this case, we will enable cache spot shadows and cache sun shadows. We’ll click “Apply.” Then, we’ll go back into the game. As we parachute down, we should see that the map looks a little bit clearer now. It doesn’t look as blurry; it doesn’t look as washed out.
This was a before, where the buildings were a little more blurry and the colors had a washed-out look, and this made it harder to see the opposition.
Now that it’s a little less blurry, we can see the buildings more clearly, the terrain is a little crisper/sharper, and we can identify opponents from a further distance now that they’re not as blurry. So we appear to have full game functionality after resolving the issue using these steps. So if you have this issue in the future, you can try utilizing these three steps to see if it helps resolve the issue on your system as well.
Related posts:
 Youtube Comments Won’t Load, Let’s Try To Fix It!
 HP SSD EX950 M.2 2TB Review
 Samsung Galaxy View 18.5-in Tablet (Google Maps)
 Add A Windows Network Adapters Shortcut To The Desktop For Easier Configuration Of Network Connections
 Stop MSI Mystic Light From Hijacking & Taking Control Of Corsair Keyboard Lighting
 DOOM 2016 PC Review
 D5 Style Pump At 12V VS 24V – Trick Or Treat?
 AMD Radeon R9 390: XFX (Unboxing)
 Samsung Galaxy View 18.5″ Tablet (Clash of Clans Demo)